Help:Adding Images
From Starbounder - Starbound Wiki
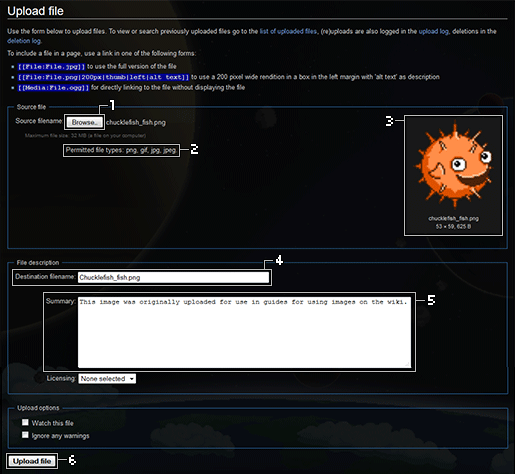
Once we have the image we want to upload, and know where it is on our computer, we click the button on the left taskbar of every wikipage entitled "Upload file"
- Select your image from within your computer's file system.
- Keep in mind the image must be in .png .gif .jpg or .jpeg format.
- Once you've selected your image, it will appear to the right along with the original file-name. The image as it is displayed will probably not be the right size, and may look a little blurry. This is OK. Below the image you can see the width and height of the image in pixels, and the physical size of the file.
- Give the image a meaningful name, if you haven't already. This is very important. It allows others, and yourself, to easily link the image within Wiki pages. Also, first letter of the file-name will capitalize automatically. Be sure to use PAGENAME_Icon.png format for icons.
- Optionally, you can add a description of the image and its purpose. This allows others to understand what it is and why it is there. If there are multiple, similar images, this is how you designate which one is which, and the importance of including it on the Wiki. If this is left blank, and the image appears to be a duplicate, it may be wrongly removed by an Editor.
- Finally, upload the image to the wiki.
Once you have uploaded the image, you can link the image by using this syntax:
[[File:Your_image_name.png]]
You can make your image more specific by adding onto the code, example below.[1]
[[File:Your_image_name.png|Thumb|Left|200x200px|description|link=Page Name]]

