Help:Resizing Images
Starbound is a sprite-based game, where all art in the game is pixel-art, frequently no larger than 16x16 pixels. In order to accurately portray the game on this wiki, steps must be taken to preserve the pixel-like appearance of all images on this wiki, even when resized.
Aliasing vs. Anti-aliasing
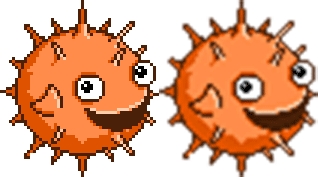
Browsers automatically scale images to the required size on command, but this is always done with anti-aliasing. To illustrate this, an image (originally 53×59) was scaled up 3 times (Fig. 1). The properly scaled image is shown on the left, and a poorly anti-aliased image on the right.
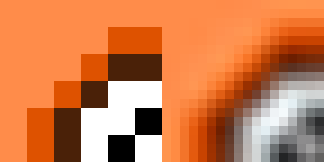
What's happening between these images is shown in Figure 2. Each pixel of the original image is repeated 3 times in the left side of each figure, creating hard borders between the colors used. On the right, the anti-aliased image attempted to smooth the image by making gradient transitions between the pixels. This is often perfectly acceptable where smooth gradients are used in images, like in photographs. But in pixel art, this is how the fine distinction between square pixels is lost. Originally only 5 colors were used on the left, 239 were used on the right and the pixelation becomes obscured.
The Solution
Now that you know what anti-aliasing is, and why it's not a good thing with pixel-art, you can appreciate the solution and how simple it is: do not anti-alias the image when resizing. That simple. It actually takes considerably more effort for the computer to anti-alias an image, because all images (historically) were aliased by default. But with our fancy modern-day computers, anti-aliasing has become the norm.
Here's how to turn off anti-aliasing in common image-processing software:
Photoshop
Image→Image Size- Set your desired width and height (keep
Constrain Proportionschecked) - In the drop-down at the bottom of the menu, select
Nearest Neighbor (preserve hard edges) - Click
OK
Gimp
Image→Scale Image- Set your desired width and height (keep the chain icon next to the
WidthandHeightboxes unbroken) - Set the
Interpolationdrop-down toNone - Click
Scale
Paint.NET
Image→Resize- Set your desired width and height (keep
Maintain aspect ratiochecked) - In the
Resamplingdrop-down at the bottom of the menu, selectNearest Neighbor - Click
OK
Remember, keep the width and height a multiple of the original width and height (making a 5×5 sprite 10×10, 15×15, etc). Also, do not downsize sprites unless absolutely necessary. Doing so will irreparably remove detail from the image.


