Guide:Getting Started/1.0
This article or section is currently in the process of an expansion or major restructuring.
You are welcome to assist in its construction by editing it as well.

Welcome Starbounder! If you're new to the game, this guide will prepare you to explore the worlds of Starbound with confidence. We're going to introduce the game's content and mechanics in the order an absolutely new player is likely to encounter them.
Main Menu
Once you start up the game, you'll be greeted with the Main Menu. In the bottom left of your screen, you can start a game, change your options, or exit out. If you've downloaded any mods from the Steam Workshop, you can manage them with the gear icon in the bottom-right.
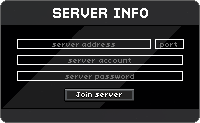
The Start Game button will start you towards a single-player game. If you're starting a new game, loading a previous save, or starting a game others will join - this is where you start. After you select your character, you'll be prompted to enter the connection information
(Quick overview of controlling sound, resolution (+full-screen vs. windowed), zoom level (what that means), what the check-boxes do, and leave "Multiplayer via Steam friends" checked. Also, don't forget to click "Accept"!)
Controls
(Without going into too many details, what the default key bindings are, and what they do/why they're useful.)
(Duh.)
Character Select
(Can have multiple characters, no limit. All characters on your computer inhabit the same universe. Also, delete - make sure you mean it.)
Character Creation
(Make sure you get it right the first time.)
Species
There are seven playable species in Starbound.
- Apex are a highly-scientific gorilla-like species.
- Avians are a bird-like species known for dedication to their god.
- Floran are an aggressive plant-like species.
- Glitch are a robot-like species that seems stuck in a medieval period.
- Humans are what you'd expect.
- Hylotl are a peaceful, three-eyed aquatic species.
- Novakids are a rambling species made out of plasma.
Note that when you generate a random name, the game offers a species-appropriate one. If you generate a random name and changes species, you'll need to generate a name again to get a new appropriate one.
Customization
(Tips/tricks. Clothing choice and color don't matter, you're going to change it anyway in-game.)
Difficulty Levels
When creating a new character, you'll have the option to select one of the following game difficulties:
- Casual
- No need to eat.
- On death you will lose 10% of pixels you are carrying.
- Survival
- You must eat food to survive.
- On death you will lose 30% of pixels you are carrying.
- Items like food, bandages, blocks, and ores are also dropped on death. (Tools and weapons are not dropped.)
- Hardcore
- You must eat food to survive.
- On death your character will be deleted.
User Interface
(If you just want to play the game's tutorial mission and come back, that's fine. Welcome to the game-proper. Move around a bit. Remember, your key-bindings can be changed and are accessed using the escape menu. Your 'use' key is your friend. Also, escape doesn't pause the game - fair warning.)
HUD
(Left to right explanation incoming.)
Player Status Bar
(Heath, energy, buffs/debuffs. Other players show up here with the same features. Also pets, but that's its own thing.)
Action Bar
(Things go here. This where you put things you want to use in the game-world without needing to go through menus. Reminder that hotkeys exist. You get the matter manipulator during the tutorial mission, or automatically if you've skipped it. Locking the bar. Careful not to throw your stuff without meaning to.)
Menu Bar
(Stuff you're going to use all the time. Hotkeys exist for these things too, sometimes just as easy to just click the icon. Special note that the quests button has special features (leave menu details to the next section).)
Menus
(More advanced interactions and player management than what hotkeys allow. Can be moved around like windows.)
Quests
(Tracks all quests, current and past. Can have multiple open quests at once, can select one to track in the HUD.)
Inventory
(List-like explanation of: Armor (functional vs cosmetic. also back armor), Stats (see: armor), Tech (you don't have any yet, they're useful though. mention this thing called an 'outpost'.), Pet Stats (just point to the 'pets' page), and actual inventory-space. Inventory-tabs are auto-sorted when they're picked up. Can drag-drop between action-bar and inventory. Trash gives you a moment to save the item if placed by mistake.)
Crafting
(This is makes the most basic things. Useful things like torches and bandages, though. Link to more advanced crafting.)
Codex
Starbound's universe has a rich history and story, some of which is available as books, sheets, guides, or other written materials. When a player finds one of these, they can use it (most easily by selecting the book in the inventory and clicking somewhere outside the inventory window) to permanently copy the book into their Codex. The Codex can be accessed at any time to read at one's leisure.
A list of available books can be found here.
Matter Manipulator Upgrade
The basic Matter Manipulator is serviceable but only a shadow of its full potential. While exploring you'll sometimes find items called Manipulator Modules. These modules can be used to upgrade your Matter Manipulator in various ways: increasing its range, increasing the size of its effect, increasing its power or unlocking new capabilities entirely. Successive upgrades are more powerful but require more modules to unlock. It will probably take you awhile to unlock everything but a full-powered manipulator is very mighty indeed.
Inspect
(Race-specific observations about an object, useful when checking against the wiki for what something is. How things are learned for the 'pixel-printer', a mid-to-late-game crafting-station. A necessary tool to use in the main quest-line.)
Beam Down/Up
(Quickly go from your ship to the planet's surface and back. Must be clear space above your character in order to beam back, also can't be too deep even if it's clear.)
Intro Mission
When creating a new character you can choose to play Starbound's introductory mission or to skip it in order to jump right into the core game. The introduction mission walks players through the game's basic controls and gives context to Starbound's evolving story and setting.
The introductory mission is recommended for all new players though - while it can be skipped - a unique item can be found within for those players looking for a particularly stylish fashion piece.
Your Ship
Your ship is your key to the universe and is the first place you'll begin the game after the introductory mission. Each race has a different ship and while ships' size can be upgraded throughout the game, your ship model cannot currently be changed to that of another race's.
Your ship is your safe place - enemies cannot spawn within and if things get dicey planetside, you can beam up to safety from anywhere on the planet as long as the following conditions are met:
- You are on the surface of a planet with a clear view of the sky - no blocks can be above you.
- You are not "deep" under the surface of the planet. Burrow too deep into the planet - even if there are no blocks above you - and your ability to beam out will be disabled until you're close enough to the surface again.
Your ship comes pre-equipped with five permanent fixtures: The Teleporter, Main Storage, S.A.I.L., Fuel Line, and the Captain's Chair.
- The Teleporter: Enables you to teleport to any other recently-discovered teleporter in the universe. Your ship does not need to be located in the same Solar System as your destination in order to teleport there.
- Main Storage: Your ship is equipped with a 48-slot storage box.
- S.A.I.L: Your ship's AI. Here you can learn about your ship status, teleport to mission-specific locations, and manage your on-board crew.
- Fuel Line: Here you can load Crystal Erchius Fuel or Liquid Erchius Fuel (Both found on moons) into your ship for use in navigating between solar systems.
- Captain's Chair: What good is a space ship if you can't fly it? Here you can fly between planets and - if you have enough fuel - even between solar systems.
You are free to place furniture inside your ship, including storage containers and workbenches.
S.A.I.L.
(How you interact with the ship's features. Can't do much when you first get your ship. Later you can access missions and manage crew from here.)
Teleporter
(Where you land when teleporting back to your ship. There are teleporters throughout the universe, and they're all connected - you just need to find them first. This one cannot be moved. Can teleport down from anywhere on the ship.)
Exploring Planets
The meat and potatoes of adventure is going to strange worlds and exploring them! Planets have randomly-generated size, length of day, gravity, geology, weather, resources and even inhabitants. Planets also fit in to some general difficulty levels ranging from safe to insanely dangerous, both in terms of terrain hazards and denizens. S.A.I.L. tells you a number of things about an inspected planet when you sit in the captain's chair so pay attention if you're looking for something specific or avoiding perils you can't take on yet.
To begin with, your ship is damaged but safely in orbit around an uncharted planet. This planet will be one of the easiest and safest types you can find, luckily for you! As you advance and repair your ship you'll be able to fly off to new ones but for now you can only beam down to begin exploring this one.
Monsters
All sorts of alien wildlife can inhabit a planet. Tiny, harmless things are commonly referred to as critters: they can be killed but are no threat whatsoever. Larger creatures are commonly referred to as monsters. Some monsters are passive and will peacefully ignore you if left alone; others are hostile and will attack the moment they notice you. Monsters can kill you! You'll need a weapon and armor (or excellent evasive maneuvers) to survive such fights.
Note that some monsters are procedurally generated and you may never see their like again. Others are specifically designed and may be seen repeatedly as you travel the universe.
Day/Night Cycle
(Every planet has a different length of day. There are more monsters out at night, and some only come out at night. Plants only grow during the day (I think -- check that for me), which is useful when farming.)
Building Your First Shelter
((this is put here in the guide to give a greater importance to it. link to other sections below) Keep out the things that want to kill you, store the loads of stuff you're going to collect, and a place to put all the crafting stations you're going to need. You're probably going to need to build a farm if you're playing on medium difficulty, because hunger.)
Resources and Materials
(This wouldn't be much of an epic-scale universe-traversing craft-tastic sandbox game without things to gather.)
Blocks
(Have their own inventory tab. There are a lot of types of blocks. Link to blocks page. Stacks of 1000. Only used for building.)
Ores
(Mined like blocks, refined into crafting items.)
Plant-life
(There are a ton of plants. Some can be grown, some can't.)
Scavenging
(How you get your first seeds for farming. Dyes are scavenged from flowers, which can't be grown. Vines and other non-farmable plants drop plant matter which can be crafted into bandages.)
Farming
(There are a lot of crops that can be farmed. To farm you need a hoe. Growing plants takes time, so grow in large batches.)
Biomes
(Each planet has several biomes, that have related blocks, plants, and monsters. The ones you are likely to find on your first planet are ... (with links to each))
Mini Biomes
(These are like biomes, but smaller, and frequently more extreme in nature. These frequently have unique items/weapons/armor/etc.)
Dungeons
(Everything from villages to sprawling evil laboratories to temples of doom. Species specific. Villages aren't hostile like the rest until you give them a reason not to be.)
Micro-Dungeons
(Everything from tiny storefronts to abandoned ruins to remote grave sites. Not always populated, almost-never hostile.)
Crafting
(...(I don't even know how to begin to introduce this, it's kinda a big subject)...)
Crafting Stations
Cooking
Crafting Tiers
Where To Go From Here
(One/two lines with links about: The outpost as a hub, tech and tech upgrades, colonies, recruiting vs buying penguin mercenaries, wiring/logic is a thing, you can paint/dye things, etc.)