Modding:Tiled/Editor
| ||||
|---|---|---|---|---|
After setting up Tiled, use it to open up one of the maps in the unpacked assets. They can be found in the dungeons/ directory, and all have .json file name extensions.
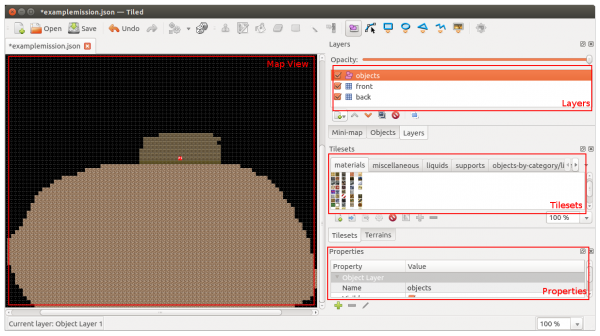
The exact layout on your screen may vary since Tiled is very configurable. But in this screenshot, on the left you have the map view, through which you’ll do most of your editing. On the right, there’s the layers panel. By clicking one of the layers in that panel, you can change which layer you’re editing. If you’re creating a map from scratch, it’s useful to know that Starbound understands only two tile layers, ‘front’ and ‘back’, and they must be named exactly that. You can have as many object layers as you like though, and there are no restrictions on how those layers are named.
Below that are the tilesets, which let you choose which material, liquid or object you’re placing into the map. On each tab along the top of the tilesets panel, there’s a different tileset, containing its own array of materials and objects. The tilesets are defined in files located in the unpacked assets at tilesets/packed/, with the .json extension. If you’re creating a map from scratch or you find that you need an object that isn’t in the tilesets already loaded, you’ll need to load a new tileset. To do that, go to Map > Add External Tileset, navigate to the tilesets/packed/ directory in the unpacked assets, and select one of the .json files. If you don’t see any .json files in there, make sure “Json tileset files” is the selected format in the open file dialog.
There’s one button you must never click in the tilesets panel on a map intended for Starbound: the Import Tileset button (). By default, maps created in Tiled contain the path to the tilesets you add to them, rather than duplicate all the contents of the tilesets. This helps keep the file size and load times down. It also means that when we add new objects to the tilesets, they’re immediately available in any maps that have already loaded those tilesets. But when Tiled imports a tileset, the contents of the tileset are duplicated inside the map file and you lose these benefits. If you click Import Tileset, which cannot always be undone, Starbound will produce an error and refuse to load the map. So don’t do that!
And finally, at the bottom is the properties view (which you might have to first enable in View > Views and Toolbars > Properties). With the properties view, you’ll be able to configure objects, and it’s currently the only way to set tilemods and spawn NPCs and monsters.
Configuration
Spending a few seconds configuring Tiled's options can make your life a lot easier:
- Make sure that View > Snap to Grid is selected. This will mean that objects in the editor will align with the grid, just like they do in Starbound. If you don't do this, they'll preview in the editor incorrectly.
- Go to Edit > Preferences and choose a nice gray for the grid color. We usually use black for the background colors in maps, so that the background tile layer can be set to 50% opacity to make the background and foreground layer visually distinct. Choosing a color that stands out against black will help with judging distance when zoomed out.

