Bosses
Bosses are very powerful enemies that require skill and strategy to defeat. They come in two types: mission Bosses and side Bosses. They are unique to other enemies in that they have a much more advanced AI, and that they cannot be afflicted with any Debuff but at the same time possess no elemental resistance of any sort with one exception (see Vault Guardian).
Mission Bosses
Mission Bosses are found at the end of quests and key story points in the game. These bosses are usually monsters (such as the Ixodoom), but can also be (or include) humanoid beings such as the Bone Dragon or Asra Nox. They will sometimes drop codexes that give information on them, which usually contain the name of the boss in the title.
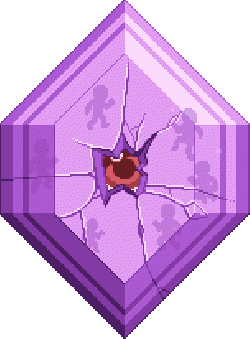
Erchius HorrorThe Erchius Horror is found in the Erchius Mining Facility mission. It spreads damaging beams of energy around it, one at first, then two after it's been shot once. It also spawns a Moontant after each beam phase. Players must activate switches around the boss to power a plasma cannon. Being struck with the cannon will cause the crystal to crack and shards will fall to the ground. After three shots the boss will be defeated, allowing players to complete the mission.
|
 |
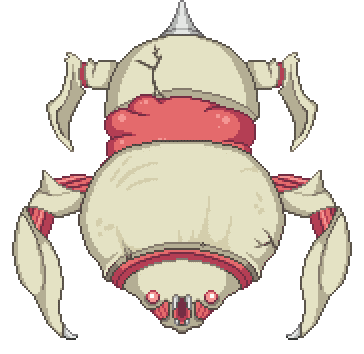
IxodoomFought in the Ceremonial Hunting Caverns mission. It first appears as an egg when you encounter it and then hatches into its main form. It appears as a giant, four-legged creature made of bone and muscle. The player fights this boss with Nuru.
|
 |
Asra NoxFought in the Great Pagoda Library mission. Asra Nox appears at the end of the Hylotl mission. She has an energy shield, can turn into a Distortion Sphere and has a powerful sword known as the Solus Katana
|
 |
Kluex AvatarFought in the Great Sovereign Temple mission. The Kluex Avatar appears at the end of the Avian mission. It fires powerful laser blasts and can summon ice pillars. It also is able to create lava.
|
|
Big ApeFought in the Miniknog Stronghold mission. Big Ape appears at the end of the Apex mission. It fires powerful laser blasts and explosives.
|
 |
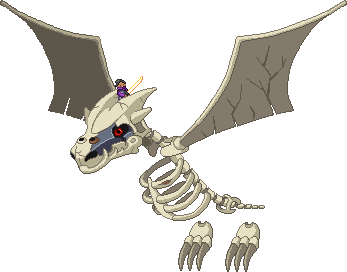
Bone DragonFought in the Baron's Keep mission. The Bone Dragon appears at the end of the Glitch mission. It breathes fire at the player and Occasus cultists also spawn to hinder the player.
|
 |
The RuinFought in the final mission. The Ruin, or The Heart of Ruin, appears at the end of the final mission after opening the gate at the ark. It flails giant tentacles, fires powerful cone lasers from its eye and summons monsters to fight alongside it.
|
 |
Mini-Bosses
Mini-Bosses are a slightly weaker variant of boss that are not encountered during the main story; rather, they are fought during optional side quests. Nevertheless, they are still formidable foes and require preparation and strategy to defeat.
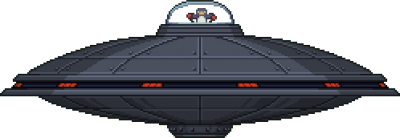
Dreadwing the PenguinEncountered in the Dreadwing mission, given by the penguin at the penguin bar at the outpost. It appears as a giant flying saucer piloted by a penguin. It spawns penguin soldiers, tanks, and mini saucers. It attacks by shooting laser beams that can break blocks or by slamming itself into the ground. This boss was first revealed in public stream at Insomnia Gaming Festival[1]
|
 |
Shockhopper MK IShockhopper MK I is a mini-boss encountered in the quest Penguin Weaponry Testing Site, given by Dr. Akaggy in the outpost. After she's defeated, Biggy's Reputable Weaponry will open up across the hall from Dr. Akaggy's workshop.
|
 |
Post Endgame
Post endgame bosses are accessible only after completing the final boss mission and serve as the ultimate challenge for even the most skilled players.
Vault Guardians

See also: Ancient Vault.
Vault Guardians are procedurally generated post endgame bosses found at the end of every Vault. A Vault Guardian is associated with one of the four types of elemental damage (fire, poison, ice or electric) which means it will take 50% less damage from its respective element weapons. It has its own name reminiscent of ancient Greece. These bosses are immune to all status effects. After defeating an Ancient Guardian it drops 1250 essence and has a 50% chance to drop a random microformer.
As Vault Guardians are procedurally generated, there's no universal strategy for defeating them. However, it's good to have a non-elemental weapon (the Asuterosaberu DX and Ex Machina work well) or weapons of all elements to minimize the chance of bringing a low-effective weapon or even maximize the chance of bringing the high-effective one (an Adaptable Crossbow is useful here). A Guardian's element is recognized by its glowing parts (orange is for fire, green for poison, blue for ice and purple for electric).
Due to their procedural generation, each one is different, though they draw their attacks from a pool. Shielded Guardians will have some way of momentarily disabling the shield. Non-shielded Guardians will either have very high health or very high defense, and the latter will have a way for you to apply a special damage buff to more effectively damage them.
The following attacks have been observed. Names are not official. If anyone has better/the official ones, please replace the names below.
- Jab: The Guardian winds up for a jab with its sword and lunges at the player. This can be a series of short jabs or one long-distance lunge. The way to avoid this is to keep moving, and use either the Sprint tech or the Blink Dash. During the multi jab, sprint back and forth, and if you must turn around, run past it between attacks. It does not deal contact damage, and jumping over it will simply get you hit.
- It should be noted that the long lunge seems to only be done by shielded bosses that have two short energy spikes in their arena. This is the key to disabling the shield, as you must get them to slam into a spike. The spikes don't harm players at all. Sometimes, the Guardian does a sweeping attack where it goes to one side of the floor and lunges across the whole arena, slamming into the opposite wall. A Pulse or Multi Jump can easily dodge this.
- Orbs: The Guardian creates large, glass-like orbs that travel horizontally at the height of any platforms around the arena. This is done to force the player off them or to set up an attack similar to the Kluex Avatar's lava attack. When this is being set up, it is done so in a way that forces the player to regularly change platforms to avoid damage.
- Lava/Poison/Electric spikes: After placing orbs, the Guardian fills the arena with either bright lava or poison. Only Fire, Poison and Electric Guardians have been observed to do this. The player must use the platforms or the Spike Sphere to avoid damage. The lava, poison or spikes only goes a tile or two high.
- Spawn Constructs: The Guardian places two tiny purple orbs, which become a tethered pair of constructs once both are placed. One is a stationary sentinel, and the other is a fish-shaped floating construct that slowly pursues the player. If one is killed, the other disappears, however, if they meet, they fuse into a larger fish-shaped construct. If the Guardian that spawned them is a non-shielded Guardian with high defense, the fused construct will spawn a special damage boost zone when destroyed, allowing the player to deal more substantial damage to the Guardian. If it is shielded, the fused construct will immediately turn into a small purple orb with a pointer, similar to the Kluex Avatar or Kluex Staff's projectiles, and fire at the player after a short delay. The projectile will disable the Guardian's shield, allowing it to be damaged.
- Spawn Construct Turrets: The Guardian places two orbs, like when it spawns tethered constructs, but the resultant 'fish constructs' have a squarer face and shoot a small series of blue orbs in bursts. Destroying them as soon as possible would be the best idea for the player.
- Spawn Construct Breakers: The Guardian places 4 orbs, that turns into 'bird constructs' that have a pointed face. These do not shoot and follow the player around the field. The player must defeat these to get a 'damage boost' status boost to effectively attack the guardian with buffed defense.
- Reflected Laser: The Guardian charges and fires a laser that reflects around the arena, aiming for the player. It does not change its aim once it fires. The beam reflects instantly, and the safe zones will be above or below where the player was when the laser was fired.
- Sweeping Laser: The Guardian fires a laser at the player for a short time, changing its aim to follow the player. Keep moving to avoid this.
- Alternating Lasers: The Guardian moves to one side of the arena and shoots blue lasers from it's hands that sweep up and down. It's always in the lower section of the room, and the highest point is slightly above the height of the Guardian, so the best strategy is to either get above him on a platform or stand next to him for half damage (his hands are staggered - one is more forward than the other, so less damage can be taken if the player waits behind the one hand).
- Spinning Lasers: The Guardian fires short, continuous lasers from it's hands and spins them around it's body, following the player. The best method of avoidance is to stand on top of the Guardian (in between the lasers) or run continuously.
- Projectile Spray: The Guardian fires a spray of small, round projectiles at the player. Fire Guardians' projectiles may explode after a short time. Use platforms and keep moving to avoid this.
Some arenas also have a pair of switches, each of which briefly activates a long spike of energy. This spike will break the Guardian's shield, allowing the player to attack it.
One Guardian has no shield but spawns chasing 'constructs' that must be defeated to spawn a 'damage boost' zone that disappears after the fourth has fallen.
There may be more attacks/arena strategies not listed here. If you see one, please add it.
|
The SwansongThe Swansong is a post endgame boss piloted by Asra Nox and is encountered in the mission The Dantalion at the end of the bounty hunting questline. It is the only boss fought in the player's Mech.
|
 |
Removed Bosses

These are bosses that once existed in the game or game files at some point but have been removed from one or both of these.
Jelly Boss
The Jelly Boss (also known as Brian) was an optional boss from pre-Upbeat Giraffe versions. It was summoned by using a Peanut Butter Trap, which required a Monster Lab to manufacture (both have since been removed). The boss dropped Endomorphic Jelly, and the codex Jelly (codex). The boss would summon Skeye Jelly minions, potentially overwhelming the player if not quelled.
| Drops : | Endomorphic Jelly (100%), Jelly (codex) (100%) | Minions : | Skeye Jelly |
|---|
Fatal Circuit

The Fatal Circuit was an optional boss from pre-Upbeat Giraffe versions. It was summoned by using a Inactive Robot, it can be crafted with Steel Bars and an Artificial Brain. The boss dropped a Processor, and the codex Fatal Circuit.
Once the Inactive Robot is put in the floor and triggered with E, it will activate and immediately begin trying to kill the player. The boss is level 20 and attacks the player with both melee attacks and a ranged flamethrower attack.
| Drops : | Processor (100%), Fatal Circuit (100%) |
|---|
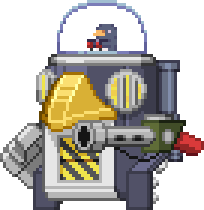
Tentacomet
The Tentacle Comet was a planned boss that would have supposedly been added in future updates. Not much is known about it. However, it is suspected that this creature was related to the one that destroyed Earth, scattering the human race throughout the galaxy.
Once defeated, it was likely supposed to drop the Tentacle Comet Codex, which had some lore info on the boss.
This was most likely supposed to be the endgame boss, fought after passing through a black hole.The boss bears a strong resemblance to the Ruin, suggesting that it was scrapped as the final boss of the game in favour of the Ruin.
| Planned Drops : | Unknown , Tentacle Comet Codex (100%) | Planned Minions : | Tentacle Comet Spore |
|---|
Sources
| Bosses | ||||||||||
|---|---|---|---|---|---|---|---|---|---|---|
| ||||||||||